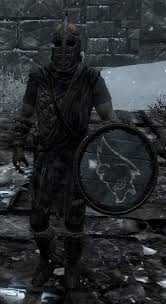
Recently I came across Will from stormthecastle.com‘s youtube channel epicfantasy. He has many, many video tutorials on making props, usually swords and other weapons, with foam board. I was fascinated by the level of quality he was able to achieve with such a cheap material. I wanted to try using foam board as a material for myself and I knew that I wanted make another Skyrim prop to go along with my Windhelm guard’s shield. Because I had never worked with foam board before, I chose a small project, the dragonbone dagger. I didn’t take the same number of progress photos as I usually do for my props because Will’s tutorial is excellent and shows in detail all the various steps.
Smoothed and sealed foam board.
I knew going in that foam board is a flimsy material which cuts easily, but cannot be refined (smoothed out or sanded) to any great degree. One thing which I disliked about Will’s prop was that the seams between the layers of foam were raw. In order to blend the layers of foam board and to fill in the gaps, I used extra hot glue which I smoothed out with my finger, ouchie ouchie! This didn’t quite give me the effect which I wanted so I used silicon to get a more accurate effect. Silicon isn’t really a good choice, but it was what I had available. I would have preferred to use some sort of putty or clay for this. To stop the silicon from peeling and to even out the seams even more, I coated the entire dagger in 5 coats of modge podge. I followed Will’s tutorial for the paint job, then sealed the project with 2 more layers of modge podge.
Day Three: I started painting the rim to look like aged metal by mixing black and silver acrylic and painting two base coats on top of the Plasti-Dip coated craft foam. I then dry-brushed on a thin layer of silver, highlighting the raised parts of the rim. After the paint was entirely dry, I mixed orange, brown, and a small amount of red paint to create a rust colour. I watered down the paint and with a wet brush, I created pools of paint wherever I wanted there to be rust. I tuck to the burnt in depressions in the foam, and places where the Plast-Dip had bubbled. After a minute of soaking, I used a paper towel to remove most of the paint.Once this had dried I noticed a few spots which needed a touch up, so I used the appropriate colour paint to apply small fixes. Then, I sealed the rim with two thin layers of modge podge. By this point, I had decided that I wanted to finish the back side of the shield as well, so I removed the bag and tape from the back side of the shield and stained the exposed wood.
Dry brushing metal
Rusting the metal
Day Four: I started by removing the bag and masking tape from the front of the shield. I noticed that the blue paint needed another coat so I added one before moving on. With the chisel tip on my wood burner, I added the planked look to the back of the shield. I made the decision not to use the single, dead centre handle that is seen in game. Instead, I created a double strap hand out of double layered foam. This turned out to be a horrible idea since the first time I used it, the foam broke. Instead, I lay two pieces of foam down where I wanted the handles to be to serve as padding against the hard wood, then I cut two pieces from an old belt to fit on top. I secured the belts in place with screws and washers which passed through the belt and foam into the wood of the shield.
Adjustable belt strapping
Foam straps area a bad idea
As usual, I learned I great deal on how not to do things. Doing, this project again (cough* Solitude) I would stain the project last, since I found that paint which overlapped with the stain required several extra coats. I wouldn’t carve out the rim in wood, since the foam rim looks much better than that would have. That was a good chunk of time which ended up being wasted. I’d also burn planks into both sides to begin with and go straight for propper strapping.
The shield was finally complete! I’m really happy with the way the shield turned out. It’s a sturdy build, and the bright logo (while note game accurate) really stands out against the battle worn look of the shield. You gotta to keep up that Stormcloak pride, am I right?
So I’ve started working on yet another new project. I wanted to create a shield to hang on my wall, and after some consideration, decided on the Windhelm Guards’ shield from Skyrim. Yes I know, I might be a wee bit obsessed with Skyrim at the moment. From looking at the in game graphics and some quick online research, I was able to come up with a design.
Day One: I started with a sheet of plywood which I had been using to stop arrows which missed my target during archery practice. It was full of arrow holes which I thought appropriate. I cut out a 24″ wide circle and proceeded to sand it until my hand hurt to much to keep going. I carved a rim around the edge and using a wood burner, created the illusion of 5 planks of wood. I then stained the perimeter of the shield a dark wood colour.
Deciding that I didn’t like the look of the carved rim, I cut out 2.5″ wide strips of black craft foam and used a heat gun to mould them over the edge of the shield. To give the new rim, a hammered, battered look, I again used the heat gun and the handle of a dinner knife. I accentuated this with the wood burner and a round tip.
Day Two: I printed out an image of the Windhelm bear emblem on several sheets of paper so that they could be taped together to form a stencil. I transferred the bear onto the shield in light pencil marks. Very carefully, I traced the image in blue acrylic paint and fleshed out the full circle. I went back in afterwards and painted the bear outline in cream paint. I used the stencil itself to add the blue eye afterwards. When the paint was dry, I went back over, adding finishing touches. Then, I used blue masking tape to carefully seal the edges of the shield next to the foam rim. I taped one half of a plastic bag over the face of the shield. I did this on both sides. Then, I applied several layers of black Plasti-Dip to the foam and waited overnight.
Over the past year I have been working on an Arsenal cosplay costume. Arsenal is Green Arrow’s ex-sidekick Roy Harper in the DC Comics Universe. Currently, he appears in the Red Hood and the Outlaws ongoing monthly series. There are very few cosplays of the character online.
I have been a Green Arrow fan for a very long time, and Roy Harper has always been an interesting character. I remember as a kid creating arrows which would ignite on contact in the garage. For lack of a bow to fire them, probably a very good thing, I would throw them into the air and then run away before they struck the pavement of the road. Street hockey would no doubt have been a safer pastime.
Comic Panel from Red Hood and the Outlaws.
As it turns out, going as an obscure comic book character only really works at comic conventions. For Halloween in Vancouver, I was only recognized when I entered the comic book store to purchase a copy of Red Hood to carry with me. “I’m this guy.” worked a lot better than trying to describe the character did.
Creating the costume was very difficult. I had to tech myself how to sew and made a lot of mistakes doing it. Things like the hat and mask were fairly easy to make, paint and a bit of foam were all i required. The vest, belt, and quiver were another matter entirely. I documented those with videos on my YouTube channel which I will post below. Making a costume as simple as this one really gave me a better appreciation for the work which goes into cosplay. This costume took me hours of labour and I gave up on the project several times. Luckily, I kept returning and the final piece was able to be worn. I don’t know when the next opportunity to where the entire costume will arise, but when it does, I’ll be sure to share it in more detail.